programming4us


Sharepoint

SharePoint 2010 : Making Enterprise Content Management Work - Records Management (part 2) - Configuring Enterprise Document and Records Management

- Free product key for windows 10
- Free Product Key for Microsoft office 365
- Malwarebytes Premium 3.7.1 Serial Keys (LifeTime) 2019
7/11/2013 8:51:47 PM

4. Walkthrough: Configuring Enterprise Document and Records Management

Let’s say you’ve set up your SharePoint environment and want to ensure that the resulting documents in your sites are properly managed. What is the best way to configure this? This section walks you through an example of setting up and configuring a document library, complete with the necessary items for proper content management. You configure Content Types, use those Content Types in a document library, enable records declaration, and enable appropriate retention policies. You then create a new menu item in the document library that allows users to submit documents to the records repository.

Step 1: Define Metadata by Using SharePoint Site Columns

If you are going to define a document retention policy and configure records management, we assume that you want to tag your documents with meaningful metadata. The metadata you define will be unique to your organization’s needs. For this example, we assume three properties: Cost Center, Product, and Fiscal Year. The best way to create metadata Columns is to define Site Columns, which are defined by 
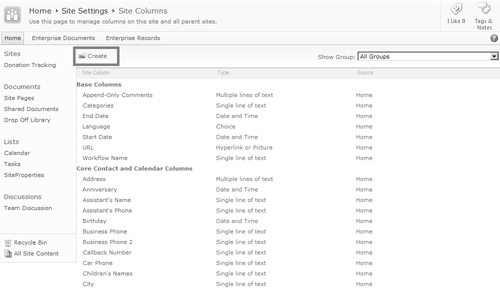
using the Site Settings page from a top-level site (see Figure 5). We use the Site Columns when we create Content Types in the next step.

Figure 5. The Site Columns option enables you to create custom properties for a Site Collection

To create a Site Column, click the Create button (see Figure 6). You will be able to enter a name, datatype, and other information. When you’ve entered your custom Site Columns, you can use them to define a Content Type.

Figure 6. Click the Create button to create a new Site Column in the Site Collection’s Site Column Gallery

Step 2: Define Content Types that Use the Site Columns

In this step, you use the Site Columns that you created in Step 1 to define custom Content Types. Content Types enable you to define specific classifications of documents by defining a name, a document template, a list of metadata properties that should be captured, and even workflows that should act upon this content. Examples of Content Types include Expense Reports, Purchase Orders, and Proposals; they can be any document that your organization uses and that has unique content management attributes . In this 
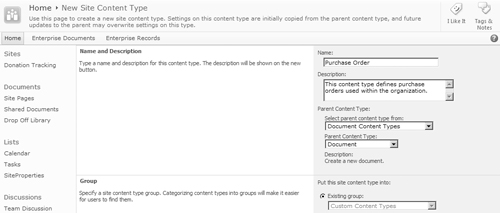
example, we create a Purchase Order Content Type. To define a Content 
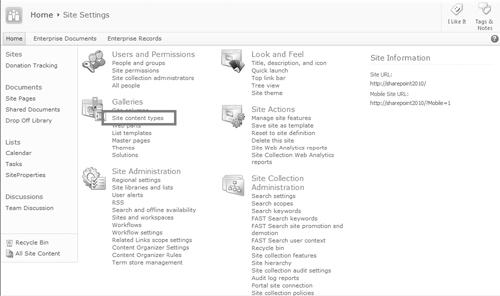
Type, click the Site Content Types option within Site Settings (see Figure 7). Click Create, which presents you with the option of creating a new Content Type (see Figure 8).


Figure 7. The Site Content Types option enables you to create custom Content Types for a Site Collection

Figure 8. Creating a new purchase order Content Type

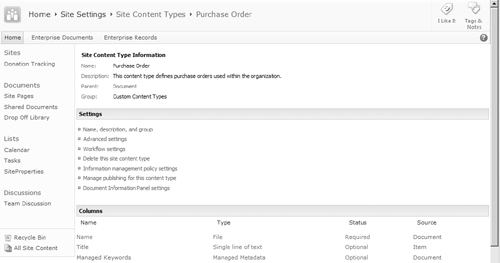
After your Content Type is created, you can configure additional properties (see Figure 9) by clicking the name of the Content Type from the Site Content Types 
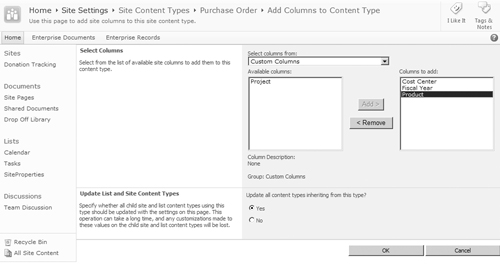
configuration page. Here you’ll want to add the Site Columns you created in Step 1; simply click the Add from Existing Site Columns link, selecting your Site Columns to add (see Figure 10).

Figure 9. The Site Content Type Information page enables you to configure additional properties for your custom Content Type. Use the Information Management Policy settings to enable retention and auditing and the Document Information Panel settings for enabling metadata entry within Office 2010.

Figure 10. The Add Columns page enables you to add Site Columns to a Content Type

Next, click Advanced Settings, which enables you to associate a document template with the Content Type. Once you’ve associated your template, you’ll have a reusable Content Type that will enable your organization to have a consistent template and collection of metadata for purchase orders, no matter where those documents are stored (provided you syndicate the Content Type for other Site Collections to use and add the Content Type to the document library, both of which we do in Step 3).

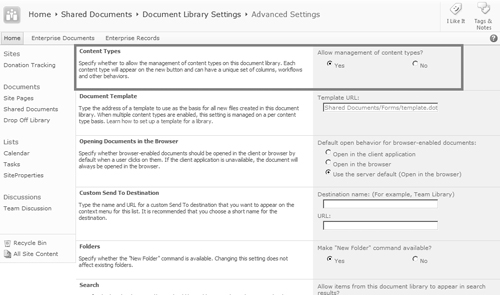
Step 3: Add the Content Type to a Document Library

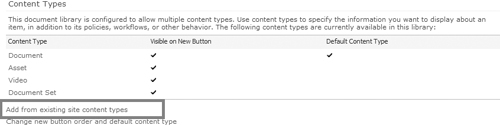
Create or locate a document library. Under Advanced Settings for the library, enable Allow management of Content Types (see Figure 11). This lets us add our Content Type to this document library. On the Document Library Settings page, click Add from existing site Content Types in the Content Types section (see Figure 12).

Figure 11. You must enable management of Content Types in the document library in order to use a site Content Type

Figure 12. Once Content Type management is enabled, a new option to manage Content Types is available

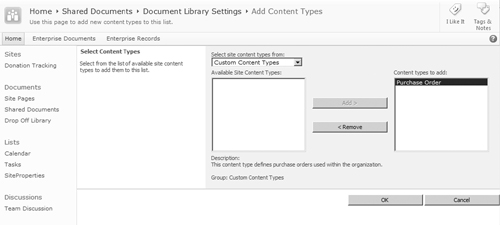
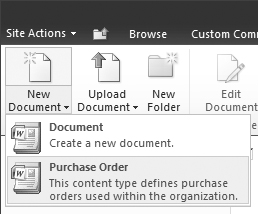
On the Add Content Types page, select the Purchase Order Content Type and add it to the document library (see Figure 13). Users are now able to create new documents with your custom Content Type directly from the new menu (see Figure 14). The Document Information Panel will automatically provide users the ability to enter metadata properties from within Word 2010.

Figure 13. Add the site Content Type to the document library

Figure 14. Content Types become available on the document library’s New menu, making it easy for organizations to encourage template and metadata usage


At this point, you are able to better manage documents because they are using consistent templates and metadata Columns. Searches will be more effective. Now it’s time to set up in-place records declaration.

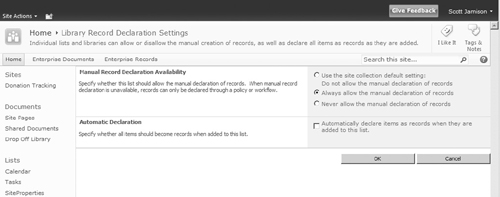
Step 4: Enable In-Place Records Management

To allow users to declare records in-place, you configure the Record Declaration settings for the library (see Figure 15).

Figure 15. To enable the ability for users to manually declare records, you must enable the setting at either the Site Collection or library level

As you have seen in this section, the document management and records management features in SharePoint 2010 enable you to create a repository to retain business documents that are necessary for regulatory compliance, business continuity, or historical interest. The ECM features of SharePoint 2010 enable you to set polices and auditing around documents. It’s an effective way to ensure that historical content is maintained, not deleted, and does not burden search engines and content navigation.

Other -----------------
- SharePoint 2010 : Making Enterprise Content Management Work - Document Management (part 3) - Document IDs, Managed Metadata
- SharePoint 2010 : Making Enterprise Content Management Work - Document Management (part 2) - Document Sets
- SharePoint 2010 : Making Enterprise Content Management Work - Document Management (part 1) - Item-level Security, Versioning Settings
- SharePoint 2010 : Setting Lockdown Mode for publishing sites, Configuring Site Collection audit settings, Accessing security policy reports
- SharePoint 2010 : Checking effective permission user interface
- SharePoint 2010 : Adding a user via PowerShell, Delegating PowerShell permissions
- SharePoint Server 2010 Business Intelligence Platform (part 6) - Reporting Services
- SharePoint Server 2010 Business Intelligence Platform (part 5) - PowerPivot
- SharePoint Server 2010 Business Intelligence Platform (part 4) - PerformancePoint Services - Time Intelligence, Decomposition Tree
- SharePoint Server 2010 Business Intelligence Platform (part 3) - PerformancePoint Services - Create a Dashboard
- SharePoint Server 2010 Business Intelligence Platform (part 2) - PerformancePoint Services - Using PerformancePoint Within a Site, Dashboard Designer, PerformancePoint Data Connections
- SharePoint Server 2010 Business Intelligence Platform (part 1) - Business Intelligence Web Parts
- SharePoint 2010 : Writing Workflows with Visual Studio
- SharePoint 2010 : Writing Workflows with SharePoint Designer
- SharePoint 2010 : Customizing Out of the Box Workflows
- SharePoint 2010 : Out of the Box Workflows
- SharePoint 2010 : Office 2010 Client Applications (part 4)
- SharePoint 2010 : Office 2010 Client Applications (part 3) - Backstage
- SharePoint 2010 : Office 2010 Client Applications (part 2) - Documents and Data Caching
- SharePoint 2010 : Office 2010 Client Applications (part 1)


Top 10
 
- Microsoft Visio 2013 : Adding Structure to Your Diagrams - Finding containers and lists in Visio (part 2) - Wireframes,Legends
- Microsoft Visio 2013 : Adding Structure to Your Diagrams - Finding containers and lists in Visio (part 1) - Swimlanes
- Microsoft Visio 2013 : Adding Structure to Your Diagrams - Formatting and sizing lists
- Microsoft Visio 2013 : Adding Structure to Your Diagrams - Adding shapes to lists
- Microsoft Visio 2013 : Adding Structure to Your Diagrams - Sizing containers
- Microsoft Access 2010 : Control Properties and Why to Use Them (part 3) - The Other Properties of a Control
- Microsoft Access 2010 : Control Properties and Why to Use Them (part 2) - The Data Properties of a Control
- Microsoft Access 2010 : Control Properties and Why to Use Them (part 1) - The Format Properties of a Control
- Microsoft Access 2010 : Form Properties and Why Should You Use Them - Working with the Properties Window
- Microsoft Visio 2013 : Using the Organization Chart Wizard with new data
- First look: Apple Watch

- 3 Tips for Maintaining Your Cell Phone Battery (part 1)

- 3 Tips for Maintaining Your Cell Phone Battery (part 2)
programming4us programming4us